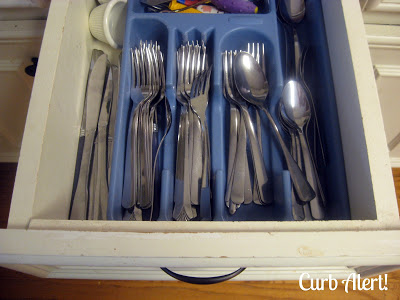
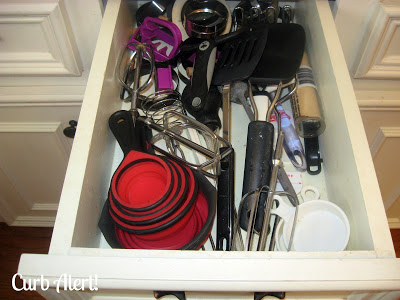
Here is a sneak peek into our kitchen utensil drawers. To a neurotic person that thrives on organization and control (me) this drives ya’ nuts. We have lived in our current home for almost 5 years now and every time I use these drawers I say to myself that I am going to find a way to make them prettier.
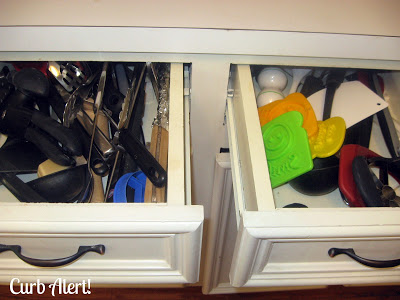

Actually the moment we moved into our 20 year old home we said we would upgrade the kitchen to more modern cabinets, new appliances, granite counters…etc. Well we have slowly but surely purchased all new sink and appliances, newer but not my favorite hardware, and as you can see no new cabinetry or granite…
5 years later!!!
Wow, I see that I really need to use the Clorox Cleanup around here a little more often!
(don’t judge, they are used by us and 4 kids, and their friends, and our friends, and so on, and so on…you get the idea)
Don’t get me wrong, even though I DO NOT enjoy cooking – I DO love my kitchen. It makes me happy and most of our family activity happens in there.

So, like I said our kitchen cabinets are over 20 years old. Our silverware dilemma bothers me nonstop – I actually organized it a little for you before I took a picture. The problem is that we have 4 children, we entertain lots therefore have tons of silverware. We even purchased cheap restaurant silverware from Sam’s Wholesale just so we do not have to do dishes constantly…
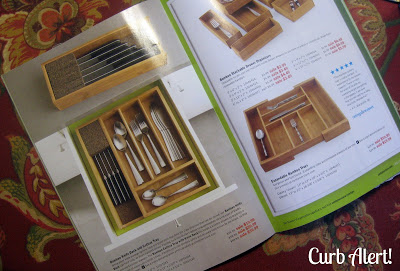
This week I received the new flyer from The Container Store and envied the cutlery trays pictured. I have purchased these before (version from Walmart) to only bring them home and not fit in our drawers. Frustrating.

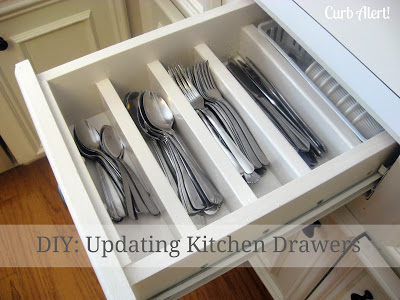
I finally decided to make my own and love how they turned out.
Here is a quick run down on how I did it.
Tools:
Table Saw
Ruler
Pencil
Eye protection
1″ wood depth
electric sander
caulk
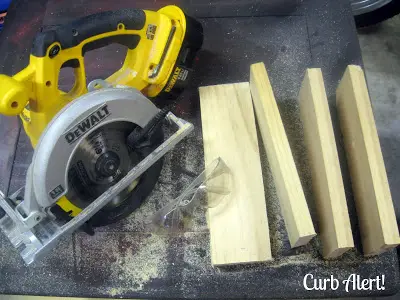
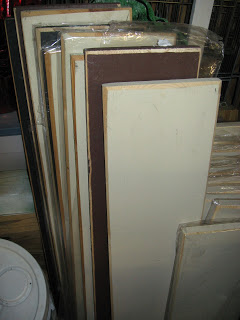
I used wood that I received free from a local Freecycle ad. You may recall reading about it HERE.
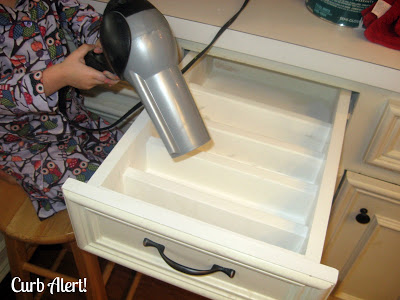
Step 1:
Plan and Measure
Clean out your messy drawers and take measurements. Remember “measure twice, cut once”. Measure the pieces so they fit about half way up the drawers, so that it would fit a lot of silverware but allow you to fit your hands easily into the slots when trying to grab them. Cut them with the table saw ( use your eye protection!) Yep that sounds good but I’m not super carpenter so I had to do a few trial runs and cut and sand a few times till they all fit properly, no biggie! It’s only a few steps out to the garage.
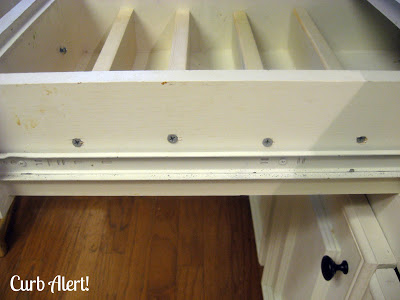
Step 2:
Dry Fit and Screw into Place
Sand them all down just a tad to get off all of the jagged edges and fit them into the drawers by placing a spacer between each slot to ensure they are placed evenly. Then screw them into the sides of the drawers.
I didn’t even take the drawers out of the cabinets!

Again, Clorox Cleanup on the Kitchen Aisle please!
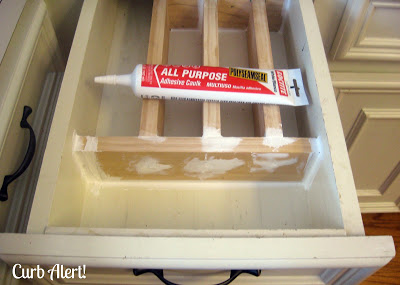
Step 3:
Caulk and Paint
I then caulked around the edges.
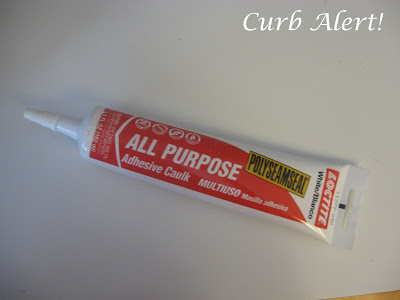
And painted with our Sherwin Williams oil based glossy white paint on hand.
I love this paint but the fumes are strong and takes about two days to fully dry.
Not fun for impatient Tami, I got a little anxious and recruited some help in the drying process!
Step 4:
Stand Back and Enjoy!
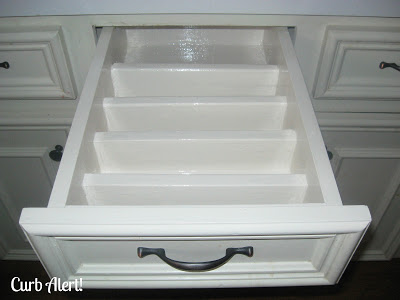
LOOKS GREAT!
Now lets see the BIG REVEAL!
I am in love (patting myself on the back)!
I was so excited that I had to text a picture to My Love, Sister, Mom and Dad to show them how happy it made me! It made me VERY HAPPY!
I am so pleased with it that I had to get started right away on the utensil drawer, still a work in progress.:
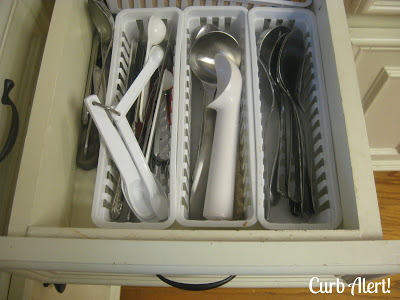
There’s even a place for sharp knives hidden under there!
Now just needs to be painted but will have to wait a few days when I don’t have 100 kids running around.
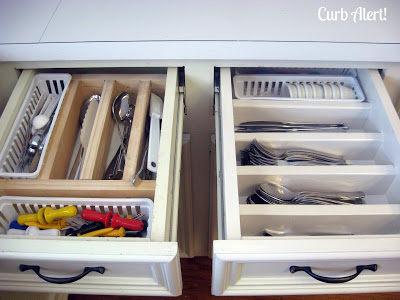
Here are my next victims as I slowly work my way around the kitchen:

Sounds like a great weekend project, what do you think?
Happy Easter Egg Hunting!
Now off to go boil some EGGS 🙂
~Tami
Linking this post up to Debbiedoo’s Copycat Challenge on April 26th.
Hope to see you there!

Also sharing this post over at these awesome blogs:


Why did I never think of dividing a drawer lengthwise? Duh! Thanks for giving me the idea! ~ Maureen
Clever, clever! I love how simple and clean the drawers look now… and I love that you texted a photo of your cutlery drawer to your nearest and dearest.
Ok now that's a really great idea! I have the same problem with too much silverware, 4 kids, and I don't like to cook… Now I'm going to try your drawer idea!
Thanks so much for the great inspiration!
Susan
Homeroad
This is awesome! You make it look so simple too. I love that you caulked it. I am a firm believer in caulking things to give a finished look. Great job!
Oh my gosh…these look awesome. Seriously my favorite project I've seen in awhile.
That looks awesome! I never would have thought to build my own drawer organizers but it's genius!
Anna
http://www.askannamoseley.com
I have this same problem with my drawers!!! definitely going to pin this to remind me to come back and try it..what a great idea! thank you for sharing!
This is so great!
I may have to do this so it's removable. (Apartment living!)
It looks so tidy.
Thanks for sharing!
So much better~! I have been contemplating doing this, thanks for the motivation = )
Awesome project! I love the "enough room" slots! 🙂
This is great!! I showed it to my hubby and hope he can help! Visiting from Craft-o-maniac!
I just love how clean and sturdy looking this is….maybe my next project…hmmmm. I love your blog name…I have been known to stop by the side of the road and pick up someones junk 🙂 I am your newest follower and would love it if you would follow me back http://necessaryinspiration.blogspot.com Thanks, Linda
I am seriously jealous! i have a gazillion modular type containers I've "tetrised" to create the look you did! But my question…how do the nooks and crannies clean? I'm a bit…obsessive about being able to dump out and clean.
This is a wonderful way to organize, and you are an amazing girl! Way to go!
Awesome job! I really need to make one of these for my kitchen :). I would love for you to link up to my Linky Party via: http://ourdelightfulhome.blogspot.com/2012/04/show-me-what-you-got-linky-party-9.html
Mrs. Delightful
http://www.ourdelightfulhome.blogspot.com
Love it. I am going to ask the hubby for some help…..andi
you're amazing!
Oh so clever!! You would probably fall over dead if you saw my drawers right now. Oh my! I might seriously have to do this…
Absolutely fabulous – I have neat drawers, but they're filled with little plastic inserts. This is a much better solution!
I love your solution for disorganized kitchen drawers. It looks so much better than the plastic trays I'm using right now inside my drawers for utensils.
I'm a new follower and hope you'll stop by.
Mary Alice
What a great idea! We are actually having a friend rebuild our drawers because they are LITERALLY falling apart. I may try this on a drawer or two and see if stabilizes them enough to avoid a complete rebuild. Why do they make kitchen drawers so flimsy anyway? I mean come on folks… its a kitchen… we fill them with heavy utensils. 🙂 Love the idea!!
What a great idea and $ saver! Yours looks better than anything you could buy…great job! Thanks for sharing at the Rock N Share! I'm sharing this on my FB page today.
Love it! And it looks so easy.
Is it possible to have a crush on silverware drawers? I LOVE what you did! I know what you mean about drooling over those organized drawers from the Container Store. However…yours, are MUCH better!! I am looking for a new home to purchase and I can't wait to get in there and make my drawers just like yours!! Thanks for sharing!
Heidi@HomemadeBeautiesByHeidi
They Look AWESOME! Great job! So jealous! Come make some for me! 🙂
Melody
One Chatty Chic
Tooooo cool for school girl! I love this idea, and it is fairly simple. Thanks for sharing and joining in on the fun! You cracked me up that you were stalking all day LOL!
You go girl! That looks so custom because you are so smart to figure out how to make those utensil dividers. Very cool. I saw your post (yeah! You're #1!) over at Debbie Doos Magazine Copy Cat Challenge.
Very cleaver idea! Thanks
Tami, what an awesome idea! Your drawers look so pretty and organize!
I know what you mean about oil paint!
It looks beautiful when is dry and very durable, but such a pain to work with. Great inspiration! You are so creative!
I need to do this….first I need to get a table saw. Thanks for the inspiration and the tutorial!
Sharon @ mrs. hines class
Great idea, fabulous copycat!
You did a great job. Pretty soon your whole kitchen will be fabulously organized, giving you more time to blog and visit parties, win/win.
Wow, I have drawer envy! LOE this practical copycat.
Linking from Debbiedoos,
Ricki Jill
You did such a professional job–I love how it turned out! (There is no stopping a handy girl with power tools.). Your kitchen will look amazing when you're finished.
What a fabulous copy cat project. It looks really great and so organized!
hugs, Linda
I am behind on my reading! This is an awesome project!
I am pinning it now 🙂
You did a great job Tami! Looks so nice.
You need to head on over to whisperwood cottages:)
Such a great idea! It look more organize and easy to find things you needed. I have bought just recently drawer insert kits coz no hubby would work this for me. It is easy to install versatile and economic.
Hmmm, I think I will make this for dresser drawers – look out sock drawer here I come!
Wow, I love this. We have the same blue plastic drawer divider. It kept sliding around the drawer till my husband glued it down. I will being copying this for sure.
Tami, I've long admired this project and your ability to use tools. I'm pinning this project as motivation and inspiration to try new things.
Sharon
Simply brilliant!
I LOVE this idea! Thanks for posting it. I am so gonna try it!
This is such a smart idea! Your drawer turned out wonderful!
Thanks for the inspiration,
Suzanne
Pieced Pastimes
PS-Would love to have you link this up to Saturday Sparks
I've been redoing and updating our kitchen recently and all our drawers are a mess. This is the perfect way to fix them.
-Cheyenne
http://cheyenne-style.blogspot.com/
Now this is something I've wanted to have done for a few years, saw s similar idea for the silverware drawer dividers but it was using cardboard covered with contact paper and the directions seemed too complicated but yours makes more sense..while I'm sure the dividers are really strong, wouldn't a thinner piece of wood do the job just as well? Beautiful job..sure inspired me. It's going on my list of projects to do for 2014. thank Your for Sharing!
Hi Tami!
I LOVE this project! I have the plastic drawer organizers that slide all over the place and drive me crazy!
I featured your project on my organizing blog today, OrganizeandInspire.com!
Thanks for the inspiration!
Great idea and one I will be implementing. Thanks so much.
Lol…I did this to three of my kitchen drawers about two months ago. Absolutely love it and has really made a huge difference in being able to find stuff. I figure I have a minimum of two more to do. Love the silverware drawer done horizontally…I can fit in more silverware that way!
5 Things to Consider Before You Paint Furniture! DIY Knockoff Wood … ddresserdrawer.blogspot.com
They Look AWESOME! Great job! So jealous! Come make some for me! 🙂
Charlotte
thekitchen.site